⚠️ The First Steps
Before you start morphing, you need to set up your library.
Click the
Presets button.
Select a folder on your hard
drive where you want to store your SnappySnap presets. This is a global setting. Click the "Load Plugin" (or +) button. In the file dialog, select your entire VST3 or Components folder and click "Open". SnappySnap will recursively scan the folder and safeguard all compatible plugins into its internal database for quick access.
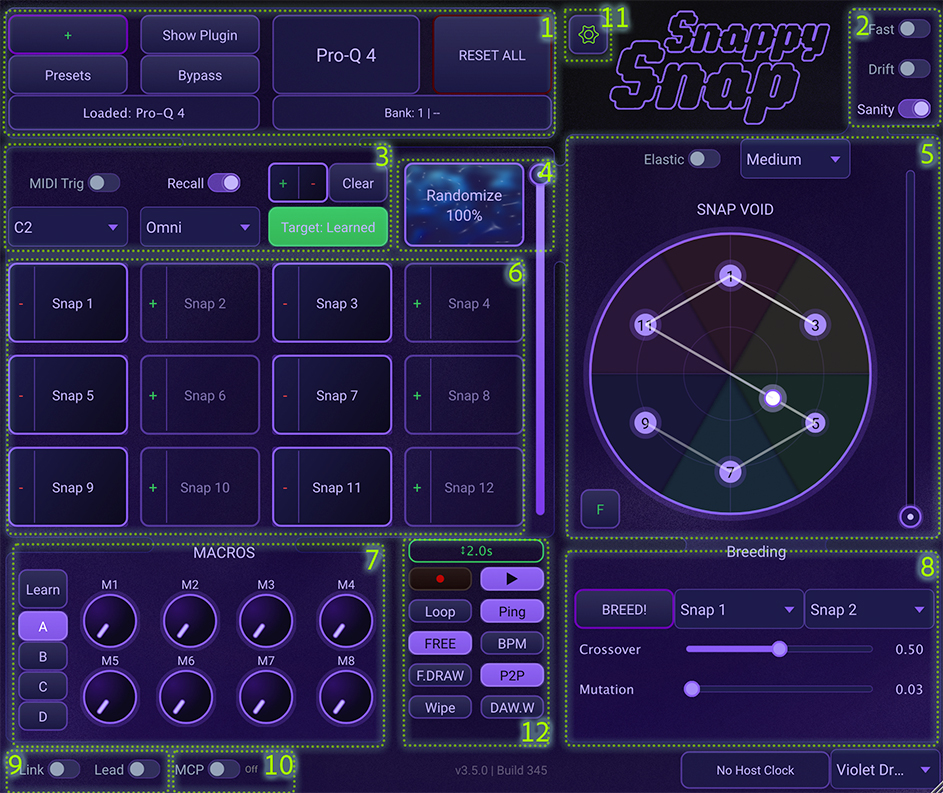
1. Plugin and Preset Managing
Plugin Controls
| Control | What It Does |
|---|---|
| Load Plugin (+) | Opens the Plugin Browser overlay. Shows categories (Synths/Effects), Favorites, and a Search bar. Effects are marked with a Greenbadge. |
| Show Plugin | Opens the graphical interface (GUI) of the hosted plugin. |
| Bypass | Bypasses the hosted plugin's processing. Useful for A/B checking. |
Preset System
All preset operations are accessed through a single Presets button, which opens the Preset Manager window.
| Control | What It Does |
|---|---|
| Presets | Opens the Preset Manager — a full-screen overlay for browsing, saving, loading, and managing your presets. Click again to close. |
| Reset All | CAUTION: Completely wipes the current patch. Clears all snapshots, unbinds all macros, and resets learning. Use this to start from scratch. |
Inside the Preset Manager
The Preset Manager is organized into two panels with controls at the bottom.
| Area | What It Does |
|---|---|
| Banks (Left Panel) | Browse 16 banks (Bank 1–16). Each bank holds up to 128 presets. Click a bank to show its presets in the right panel. |
| Presets (Right Panel) | Lists all presets in the selected bank, displayed as
ID Plugin — Name. The currently loaded preset is marked with a
▸ pointer. Double-click any preset to load it instantly. |
| Save | Saves the entire chain — the hosted plugin, its internal state, and all SnappySnap snapshots — as a preset in the current bank. If a preset with the same ID already exists, you'll be asked to confirm the overwrite. |
| Load | Loads the selected preset. Restores the plugin, all parameters, snapshots, and snapshot names. |
| Delete | Permanently removes the selected preset file. A confirmation dialog appears before deletion. |
| ID Field | Assign a number (1–128) to your preset. This controls its position in the bank. Leave empty to auto-assign the next available number. |
| Name Field | Give your preset a descriptive name (e.g., "Warm Pad"). This is combined with the plugin
name in the filename: 005_Diva_Warm Pad.xml |
| Presets Folder | Set the root directory where all your preset banks are stored. This is a global setting remembered across sessions. Bank folders (Bank 1–16) are created automatically. |
Because SnappySnap presets store the application inside them, you can build a Universal Sound Wall.
Instead of browsing 10 different synths for a "Bass", just save your favorite basses from Serum, Diva, and Vital as SnappySnap presets.
Cool Move: You can load a SnappySnap preset (e.g., "MegaReese.snappy") and it will automatically launch Diva and load the patch. You don't even need to remember which plugin made the sound!
2. Fast, Sanity and Drift Modes
These toggles change how SnappySnap interacts with the hosted plugin's state.
| Mode | How It Works |
|---|---|
| Fast Mode |
|
| Sanity Mode |
|
| Drift Mode |
|
Drift Settings
Drift Mode offers extensive control over autonomous movement behavior.
Right-click anywhere on the XY Pad to open the Drift Settings overlay. The overlay is draggable - click and drag it anywhere on the interface. Close it with the small × button in the top-right corner.
Drift Modes
| Mode | Behavior |
|---|---|
| Free | The cursor wanders freely across the entire XY pad with no destination. Perfect for ambient textures and unpredictable evolution. |
| Anchored | The cursor wanders but is pulled back toward an anchor point (the position where you enabled Drift). Use Gravity to control the pull strength. Great for subtle variations around a sweet spot. |
| Orbit | The cursor orbits in a circle around the center of the pad. Distance sets the orbit radius. Perfect for rhythmic, cyclical modulation. |
Drift Parameters
| Parameter | Effect |
|---|---|
| Speed | How fast the cursor moves (0 - 10). Uses exponential scaling:
|
| Distance | How far the cursor can travel from its anchor (0 - 100%). In Orbit mode, this sets the orbit radius. |
| Chaos | Complexity of the movement pattern (0 - 100%). Low = smooth, predictable curves. High = erratic, jittery motion. |
| Gravity | (Anchored mode only) Pull strength toward the anchor point. High gravity = stays close to anchor. Low = wanders further away. |
| Smooth | Movement smoothness (0 - 100%). Low = responsive, snappy. High = gradual, flowing transitions. |
Drift Controls
| Button | Action |
|---|---|
| Drift Toggle | Master on/off for drift. When re-enabled, drift starts from the current cursor position (not the old position). |
| Freeze | Temporarily pauses drift movement. The cursor stops where it is. Unfreeze to resume from the same position. |
| Nudge | Gives the cursor a random push in a random direction. Great for breaking out of repetitive patterns. |
| Reset | Returns the cursor to the current morph position and re-anchors there. Use this to "re-center" after drifting too far. |
Ambient Pads: Set Mode to Free, Speed to 1-2, Distance to 50%, and Smooth to 80%. Your pad will slowly evolve through all your snapshots over time.
Controlled Variation: Use Anchored mode with high Gravity (70%+) to stay near your favorite sound while adding subtle movement.
Rhythmic Cycling: Set Mode to Orbit, adjust Speed to match your tempo, and use Distance to control how dramatic the changes are.
3. Exclusive Randomization & MIDI Triggers
Parameter Pool (Learn / Unlearn)
The + and - buttons let you build a pool of specific parameters. This pool controls which parameters are affected by Randomization, Breeding, and which parameters are exposed to AI via MCP.
| Control | Description |
|---|---|
| + (Learn) | Enters add-listen mode. While active, any parameter you move on the hosted plugin is added to the learned pool. Click again to stop listening. Automatically switches Target to "Learned" when done. |
| - (Unlearn) | Enters remove-listen mode. While active, any parameter you move is removed from the learned pool. Useful for fine-tuning your selection without starting over. |
| Target | Toggles between All (randomizes everything) and Learned (randomizes only parameters in the pool). When set to Learned, snapshots will also only save and recall the pooled parameters. |
| Clear | Empties the entire learned pool and resets Target back to "All". |
The learned pool also controls which parameters are visible to AI assistants via the MCP bridge. When the pool is active, only pooled parameters are exposed to AI — everything else is hidden. This gives you precise control over what an AI can see and modify. With an empty pool, all non-critical parameters are exposed by default.
MIDI Snapshot Triggers
Trigger snapshots using your MIDI keyboard.
| Control | Description |
|---|---|
| MIDI Trig | Enables the MIDI triggering system. |
| Octave | Selects the "Trigger Octave" (e.g., C3).
|
| Recall | Controls how MIDI triggers affect the hosted plugin.
|
This feature works brilliantly with Hardware Keyboards. Assign the trigger octave to the lowest octave of your keyboard (e.g., C-2).
You can play chords/melodies with your right hand while using your left hand to "play" the snapshots rhythmically.
🥁 Rhythmic Effects: Try sending a Drum Pattern sequence on the trigger octave. This allows you to "sequence" the plugin state in perfect sync with your drums, creating complex glitches or chord changes that lock to the groove!
4. Randomization Controls
The heart of generative sound design.
| Control | How It Works |
|---|---|
| Randomize | Applies the randomization algorithm to the target parameters. |
| Amount Slider | (Vertical slider next to button)
|
5. Morphing and Elastic Modes
Morphing blends between your saved snapshots.
| Control | Description |
|---|---|
| Morph Slider | Linear morphing. Travels from Snapshot 1 → 2 → 3... → 12. Ideal for sequenced progression. |
| XY Pad | 2D Vector morphing. Your sound is a blend of all 12 snapshots weighted by your distance to them on the circle. |
| Elastic Mode | Enables physics simulation (mass/spring) for the morph cursor. The cursor "chases" your mouse. |
| Elasticity | Controls the "mass" of the cursor:
|
Fullscreen Mode — F Button
Click the F button (top of the main interface) to enter Fullscreen XY Pad mode. The XY pad expands to fill the entire plugin window, the snapshot buttons hide, and a transport bar appears at the top. Press F again, the Escape key, or the × button in the transport bar to exit.
The transport bar in fullscreen is a mirror of the Waypoint System — all the same REC, PLAY, F.DRAW, P2P, Loop, Ping, FREE, BPM and DAW.W controls are available. In addition, fullscreen adds two new toggle buttons that change how the cursor interacts with the snapshots: Move and Mass.
Move and Mass are mutually exclusive — only one can be active at a time, and when neither is active, normal cursor morphing resumes (click anywhere on the pad to move the morph cursor as usual). Both modes are fullscreen-only — they have no effect outside fullscreen.
Move — Reposition Snapshots
When Move is ON, click and drag any snapshot circle on the XY pad to reposition it. The cursor changes to a drag-hand when you hover over a snap.
Snapshot positions are stored as normalized coordinates in the [0, 1] range and are clamped to the pad bounds. The Voronoi morph regions and weights are recalculated automatically as you drag.
Live P2P updates: If a P2P route is currently playing while you move a snapshot, the playback path follows the new snapshot positions on the fly — no need to stop, re-record, or rebuild the route. P2P routes are stored as a sequence of snapshot indices, so the segments between snaps are continuously re-evaluated as the snaps move. Free-Draw paths are not affected because they store explicit XY coordinates and are independent of snapshot positions.
Mass — Snapshot Influence Weight
When Mass is ON, each snapshot displays a gravity ring around it. The ring's radius represents that snapshot's influence weight in the morph computation. Click and drag a ring outward to increase its mass, or inward to decrease it. The cursor changes to a left-right resize cursor when you hover over a ring.
Double-click a ring to reset that snapshot back to neutral mass (1.0).
| Mass Value | Effect on Morph |
|---|---|
| 1.0 (default) | Neutral. The snapshot has equal influence to its neighbours, weighted by Voronoi cell area. |
| < 1.0 (down to 0.1) | Reduced influence. The snapshot still exists at its position but contributes less to the morph blend in its surrounding area, so neighbouring snapshots dominate more. |
| > 1.0 (up to 3.0) | Increased influence. The snapshot's weight extends further from its center, "pulling" the morph toward it from a wider area of the pad. |
6. Snapshot System
You have 12 slots arranged in a clock face.
| Action | How to Use |
|---|---|
| Save (+) | Stores the current state of the plugin into this slot. |
| Recall (#) | Instantly loads the saved state. |
| Clear (-) | Erases the snapshot data from this slot. |
| Rename | Right-Click the snapshot button to rename it. Select "Clear Name" to reset to "Snap X" . |
7. Macro Controls
32 assignable macro knobs organized across 4 pages (A, B, C, D), with 8 knobs (M1–M8) visible per page. Macros override any hosted plugin parameter and persist while morphing.
| Control | Description |
|---|---|
| Pages A / B / C / D | Switch between 4 macro pages. Each page holds 8 knobs (M1–M8), giving you 32 assignable macros in total. |
| Learn | Enables Macro Learning mode. |
| Assigning | 1. Enable Learn. 2. Touch a Macro Knob (M1–M8) on the current page. 3. Touch a parameter on the hosted plugin. Done! The name updates automatically. |
| Unbind (x) | Click the small 'x' button below a macro knob to clear its assignment. |
When a parameter is assigned to a Macro, SnappySnap excludes it from all Randomization and Morphing.
This ensures you have total control: You can draw automation curves for your Macros in your DAW without the internal engine "fighting" you or overwriting your values!
8. Breeding (Genetic Engine)
Create new "Child" presets by combining the DNA of two "Parents" .
| Control | What It Does |
|---|---|
| Parent A / B | Select the two source snapshots you want to combine. |
| Crossover | Determines the mix ratio. 0% = Pure Parent A, 100% = Pure Parent B, 50% = Equal mix of parameters. |
| Mutation | Adds randomness to the child. High mutation = extreme variations (errors) in the DNA. |
| BREED ! | Generates the new sound instantly. If you like it, save it to a new Empty Snapshot (+) slot ! |
9. Link-Lead (Multi-Instance Sync)
The Link-Lead feature enables real-time synchronization between multiple SnappySnap instances running in the same DAW project. One instance acts as the Leader, broadcasting its state, while all other linked instances act as Followers, receiving and applying those updates automatically.
Controls
| Control | Description |
|---|---|
| Link | Toggle in the bottom bar. When enabled, this instance joins the linked group and will receive synchronized updates from the Leader instance. Enabling Link makes the instance ready to follow. |
| Lead | Toggle that appears when Link is ON. Activating Lead makes this instance the controller — all other linked instances will mirror its state. Only one instance can be Leader at a time; setting a new Leader automatically releases the previous one. |
What Gets Synchronized
When Link-Lead is active, the Leader broadcasts the following parameters 60 times per second to all Followers:
| Parameter | Description |
|---|---|
| XY Morph Position | The puck position on the XY pad (Morph X and Morph Y) |
| 1D Morph Value | The linear morph slider position (Snappy knob) |
| Drift Settings | All drift parameters: Enabled, Mode (Free/Anchored/Orbit), Speed, Depth, Chaos, Gravity, Smoothness, and Frozen state |
| MIDI Trigger Settings | MIDI snapshot triggering on/off and base octave selection |
| Snapshot Triggers | When the Leader triggers a snapshot (via MIDI or UI), all Followers recall their own snapshot at the same index |
Use Cases
- Multi-Layer Sound Design: Load the same synth in multiple instances with different snapshots. Link them and morph all layers simultaneously from one XY pad.
- Parallel Processing: Create linked effect chains that morph together for cohesive sound design.
- Stereo Effects: Run separate left/right channel processing with perfectly synchronized modulation.
- Live Performance: Control multiple instruments from a single controller by designating one instance as Leader.
- MIDI Sequencing: Program snapshot triggers on the Leader, and all linked instances will change sounds together.
Enable Drift Mode on the Leader instance, and all linked Followers will follow the autonomous movement pattern. This creates evolving, synchronized textures across multiple instruments with zero effort.
10. AI Bridge (MCP Integration)
SnappySnap is the world's first audio plugin with native AI agent connectivity. Using the Model Context Protocol (MCP), any compatible AI assistant can directly control your plugin through natural conversation.
Getting Started
▼Step 1: Enable MCP Server
- Open SnappySnap (standalone or in your DAW)
- Toggle Enable MCP Server ON in the bottom-left corner
- A port number will appear (like
52001)
Step 2: Copy Your Security Token
- Click the "i" icon (info panel) to see your token
- This token is your password — keep it private
- Also found in:
~/Library/Application Support/SnappySnap/settings.xml
Step 3: Connect Your AI Assistant
- Claude Desktop: Add SnappySnap in MCP servers settings with your port and token
- Other AI Tools: Use
http://127.0.0.1:<PORT>with bearer token authentication
What Can the AI Do?
▼View & Analyze
- See which plugin is loaded and all its parameters
- View saved snapshots and current morph position
- List all your installed plugins
Change Parameters
- Adjust any parameter by name ("turn up the drive")
- Set exact values ("set reverb to 75%")
- Fuzzy matching: "cut the highs" finds "High Cut Frequency"
Snapshots & Morphing
- Save/load snapshots to any of 12 slots
- Name your snapshots ("save this as Heavy Bass")
- Control morph position in 1D or 2D mode
Randomize & Explore
- Randomize parameters for happy accidents
- Exclude specific parameters from randomization
- Filter to only "sound design" parameters
Example Conversations
▼Tips for Best Results
▼Be Specific
- Instead of "make it better" → "make the bass fuller and reduce harshness"
- Instead of "change the sound" → "add more movement and modulation"
Use Musical Terms — the AI understands:
- "Warmer" / "Brighter" / "Darker"
- "More attack" / "Softer transients"
- "Tighter bass" / "More presence"
- "Wet" / "Dry" / "Blend"
Save Before Experimenting
- Ask: "Save this to slot 0 as 'Starting Point', then try making it more aggressive"
- You can always go back if you don't like the changes
Troubleshooting
▼"Connection Refused"
- Make sure SnappySnap is running
- Check MCP Server is enabled
- Verify the port number matches
"Unauthorized"
- Copy a fresh token from SnappySnap settings
- Make sure you're using the complete token
- Check for extra spaces when pasting
"No Plugin Loaded"
- Load a plugin in SnappySnap first
- Wait for the plugin to fully initialize
Privacy Note: MCP runs on localhost only. The AI can only see plugin parameters — not your audio, files, or other applications.
11. Settings (Info Overlay)
Click the "gear" button in top to open the Settings overlay. This panel contains all global configuration options organized into distinct zones.
Version & License
The top of the overlay shows your current version number and license status. From here you can:
- Help — Opens this user manual
- Activate Full License — Enter your license key (shown only in trial mode; displays "Licensed" when activated)
- Update Check — Shows whether an update is available and provides a direct download link
GPU & Shader Settings
| Setting | Description |
|---|---|
| GPU Render | Enable or disable GPU-accelerated rendering. Disable this if you experience visual glitches or crashes (especially on some AMD graphics cards in Ableton). |
| Shaders | Enable or disable visual shader effects for better performance. Only available when GPU Render is enabled. |
MIDI Control
Configure which MIDI CC numbers control key functions. Each value can be set from 0–127, or -1 (Off) to disable. Drag vertically to change values, click to type directly, or use the mouse wheel.
| Assignment | Description |
|---|---|
| Bank Select | CC number for switching preset banks |
| Preset Select | CC number for selecting presets within the current bank |
| Program Change | Toggle MIDI Program Change messages on or off for preset switching |
| Snap Save | CC number to trigger saving the current state to a snapshot slot (0–116) |
| Snap Erase | CC number to erase a snapshot slot |
| Reset | Reset all MIDI CC assignments to their default values |
MCP Status & Setup
The bottom section shows the current MCP server status (port, connected agents, session ID, and auth token) along with configuration controls for AI client integration. See Section 10: AI Bridge for full details.
- Mode Selector — Switch between Direct (bundled binary via stdio) and Bridge (network via mcp-remote)
- Client Configuration — Auto-configure Claude Desktop, Windsurf, or Antigravity with one click
- Claude Code — Copy the shell command to add SnappySnap as an MCP server in Claude Code
12. Waypoint System
The Waypoint System records cursor movements and snapshot sequences on the XY pad and plays them back as a continuous loop. It is built around three independent mode groups (recording style, loop direction, and timing source) plus a separate DAW automation export toggle.
The transport bar exposes seven buttons split into three radio groups and one independent toggle. Recording and playback are mutually exclusive — pressing PLAY while recording stops the recording first, and vice versa.
Recording Modes — F.DRAW / P2P
Choose how the path is captured. Switching modes does not interrupt an active recording — it only affects the next REC press.
| Button | Behavior |
|---|---|
| F.DRAW | Free Draw mode. After pressing REC, the first cursor movement on the XY pad arms the recorder. Cursor positions are then captured at mouse-event rate and smoothed to remove jitter. Releasing the mouse or clicking REC again stops the take. Maximum length is ~30 seconds. Playback uses spline interpolation with arc-length parameterization, so the cursor moves at constant speed regardless of how fast or slow you drew the original path. |
| P2P | Point-to-Point mode. After pressing REC, click on snapshot circles in the XY pad to build a route. Each click appends that snapshot to the route and triggers a red pulse ring on the clicked snap. Duplicates are allowed (e.g., A → B → A → C). Click REC again to stop. Maximum 24 entries per route. Playback linearly interpolates the cursor between consecutive snapshots in the route order. |
Loop Direction — Loop / Ping
Choose how playback cycles when it reaches the end of the path. Both modes loop indefinitely until PLAY is pressed again. Switching between Loop and Ping during playback applies on the next cycle — there is no interruption.
| Button | Behavior |
|---|---|
| Loop | Forward Loop. Plays the path from start to end, then jumps back to the start and repeats: 0 → 1 → 0 → 1 → … |
| Ping | Ping-Pong. Plays the path forward, then backward, then forward again, bouncing at each end without the jump-back. |
Timing Source — FREE / BPM
Choose what clock drives the playback phase. The value display next to these buttons shows the current loop length and is drag-sensitive (drag up to increase, drag down to decrease).
| Button | Behavior |
|---|---|
| FREE | Free-Running. Playback is driven by an internal timer, independent of the DAW transport. The loop length is set in seconds (range 0.01 s – 30 s, default 5 s). Useful in standalone mode or when you want motion that ignores the host tempo. |
| BPM | BPM Sync. Playback is locked to the host DAW's transport position. The loop length is set in beats, with eight fixed options: 1/4, 1/2, 1, 2, 4, 8, 16, and 32 beats. When the DAW transport is stopped, the cursor freezes in place; when it plays, the phase is computed from the host's PPQ position. If the host does not provide playhead data (e.g., standalone), the system falls back to Free-Running. |
Recording to the DAW — DAW.W
DAW.W (DAW Write) is a separate, independent toggle — not part of any radio group. It enables writing the morph cursor position back to the DAW as parameter automation.
When DAW.W is enabled, the plugin continuously compares the current effective morph X/Y/1D position against the previous tick and, if it has changed, calls the host's automation API for the morph parameters. This allows the DAW to record motion from the Drift engine or from waypoint playback as automation lanes on the plugin's track.
To actually capture the automation, the DAW's automation record button must also be armed on the track. DAW.W only sends the values; the DAW decides whether to record them.
Transport — REC and PLAY
| Button | Behavior |
|---|---|
| REC (●) | Toggles recording on/off in the currently selected Recording Mode (F.DRAW or P2P). Pressing REC while playback is active stops playback first. In F.DRAW mode, releasing the mouse on the XY pad also stops recording automatically. |
| PLAY (▶) | Toggles playback on/off using the most recently recorded path and the currently selected Loop and Timing modes. Pressing PLAY while recording stops the recording first. When PLAY is stopped, the cursor stays at the last playback position. |
How Time Is Measured
The plugin measures playback time in two completely separate ways depending on the Timing Mode:
- FREE (Free-Running) uses an internal timer. Each tick advances the phase by
(1 / tick_rate) ÷ duration_in_seconds. One full cycle equals the duration you set in seconds. The DAW transport is ignored. - BPM (BPM Sync) reads the host's PPQ (pulses per quarter note) position from the audio host on every audio block, then maps it to a normalized phase using the configured beat-length:
phase = (beats_elapsed mod loop_beats) ÷ loop_beats. When the host stops the transport, the phase stops updating, so the cursor freezes wherever it is. Ping-pong mode uses a 2× cycle length internally so that the bounce is also tempo-locked.
In F.DRAW recordings, the captured timestamps are normalized to the [0, 1] range after recording stops, and the path is then re-parameterized by arc length. This means playback speed is constant in screen-space — fast scribbles and slow drags both play back smoothly at the same rate.
In P2P recordings, there are no timestamps at all — the route is just an ordered list of snapshot indices, and the phase is divided evenly across the segments at playback time.
13. DAW Exposed Parameters and MIDI
SnappySnap is designed to be completely controlled by your host. We expose key parameters to the DAW, allowing you to use automation, LFOs, and Sidechain modulators to drive the morphing engine.
Exposed Parameters
| DAW Parameter Name | Function | Best Use Case |
|---|---|---|
Snappy |
The Main Morph Knob (0.0 - 1.0). Sweeps through all 12 snapshots linearly. |
Automate this for long, evolving builds or rhythmic gating effects. |
Morph X / Morph Y |
Controls the puck position on the XY Pad. | Map to a hardware joystick or chaos LFOs for unpredictable textures. |
Macro 1 - 8 |
Direct control over the 8 global macros. | The primary targets for Envelope Followers and Sidechain routing. |
Save X / Recall X |
Trigger buttons for specific slots. | Programmatic state changes via MIDI clips or step sequencers. |
Drift Enabled |
Master on/off for autonomous drift. | Toggle drift at specific points in your arrangement. |
Drift Speed / Distance / Chaos |
Controls drift movement parameters. | Automate to change drift behavior over time (slow intro → fast climax). |
MIDI CC & Program Change Integration
SnappySnap responds to standard MIDI Control Change and Program Change messages, giving you full control over bank/preset switching, snapshot saves, and morph triggering directly from your MIDI controller or DAW MIDI clips.
MIDI Channel
By default, SnappySnap listens on Omni (all channels). You can restrict it to a specific channel (1–16) in the plugin's MIDI settings. All CC, PC, and note-based triggers respect this channel filter.
Bank & Preset Switching
| MIDI Message | Value Range | Function |
|---|---|---|
CC #0 (Bank Select MSB) |
1 – 16 | Selects the active preset bank. Send this before a Program Change or CC #1. |
Program Change |
0 – 127 | Loads the preset at that index within the currently selected bank. |
CC #1 (Mod Wheel) |
0 – 127 | Alternative preset select (same as PC) — useful in DAWs that don't easily send Program Changes. |
1. Send CC #0 with a value of 1–16 to select the desired bank.
2. Send a Program Change (0–127) or CC #1 (0–127) to load the preset.
Example: To load Preset 42 from Bank 3:
→ CC #0, Value: 3 (selects Bank 3)
→ Program Change 42 (loads preset 42)
The bank selection is remembered — subsequent Program Changes will stay on the same bank until you send a new CC #0.
Snapshot Save via MIDI
| MIDI Message | Trigger Condition | Function |
|---|---|---|
CC #110 |
Value > 64 | Save current state to Snapshot Slot 1 |
CC #111 |
Value > 64 | Save to Snapshot Slot 2 |
CC #112 |
Value > 64 | Save to Snapshot Slot 3 |
CC #113 |
Value > 64 | Save to Snapshot Slot 4 |
CC #114 |
Value > 64 | Save to Snapshot Slot 5 |
CC #115 |
Value > 64 | Save to Snapshot Slot 6 |
CC #116 |
Value > 64 | Save to Snapshot Slot 7 |
CC #117 |
Value > 64 | Save to Snapshot Slot 8 |
CC #118 |
Value > 64 | Save to Snapshot Slot 9 |
CC #119 |
Value > 64 | Save to Snapshot Slot 10 |
CC #120 |
Value > 64 | Save to Snapshot Slot 11 |
CC #121 |
Value > 64 | Save to Snapshot Slot 12 |
Send any value above 64 (e.g., 127) to trigger the save. Values 0–64 are ignored, so you can safely use momentary buttons or automation without accidental triggers.
Snapshot Erase via MIDI
| MIDI Message | Value | Function |
|---|---|---|
CC #109 |
1–12 | Erase Snapshot Slot 1–12 (value selects slot) |
Send the slot number (1–12) as the CC value to erase that snapshot. Value 0 is ignored.
MIDI CC Quick Reference
| CC # | Name | Action |
|---|---|---|
0 |
Bank Select MSB | Set active bank (1–16) |
1 |
Mod Wheel / Preset Select | Load preset (0–127) from current bank |
109 |
Snapshot Erase | Erase slot 1–12 (value = slot number) |
110–121 |
Snapshot Save | Save to slots 1–12 (value > 64 to trigger) |
All MIDI CC numbers for bank switching, preset selection, snapshot save, and snapshot erase can be changed in the Settings overlay (gear button) under the MIDI Control section.
🔥 Creative Tip: Audio Sidechain Morphing
Want your synth to "duck" or "morph" every time the Kick drum hits? You can use SnappySnap as a destination for your DAW's Envelope Follower.
1. In your DAW: Place a Kick Drum on a separate track.
2. Add an Envelope Follower (e.g., Ableton "Envelope", Bitwig "Audio Sidechain") to the Kick track.
3. Map the Envelope Follower to the
Snappy parameter of SnappySnap.4. In SnappySnap: Set Snapshot 1 as your "Dry" sound and Snapshot 6 (approx 50%) as your "Wet/Morphed" sound.
5. Result: Every kick hit pushes the parameter from 0.0 → 0.5, temporarily morphing your sound into a completely different texture on the beat!
Instead of morphing the whole plugin, map a sidechain signal to Macro 1. Then, assign Macro 1 to just the Filter Cutoff and Drive inside SnappySnap. Now your external audio signal drives a specific, multi-parameter modulation inside the hosted plugin!
Ableton Live: Exposed Parameters Limitation
Ableton Live has a built-in limit of 128 configurable parameters per plugin, and an auto-populate threshold (typically around 64 parameters) that determines whether parameters appear automatically in the device panel. SnappySnap exposes 79 parameters in total, which may exceed this threshold and prevent auto-population.
Additionally, Ableton's Configure mode may not detect button-style toggles (like Save, Recall, or Randomize) because these parameters send their gesture messages instantaneously, too fast for Ableton to register.
Both issues can be resolved by creating a simple text file called Options.txt.
How to Create Options.txt
- Open a plain text editor (TextEdit on Mac, Notepad on Windows).
- Paste the following two lines:
-NoVstGesturesRequired
-_PluginAutoPopulateThreshold=128 - Save the file as
Options.txt(make sure it is plain text, not .rtf or .docx). - Place the file in your Ableton Preferences folder:
ReplaceOS Path macOS ~/Library/Preferences/Ableton/Live x.x.x/Options.txtWindows C:\Users\[username]\AppData\Roaming\Ableton\Live x.x.x\Preferences\Options.txtx.x.xwith your Ableton version number (e.g.,12.3.5). - Restart Ableton Live for the changes to take effect.
What Each Setting Does
| Setting | Effect |
|---|---|
-NoVstGesturesRequired |
Allows Ableton to detect all parameter changes in Configure mode, including button toggles (Save, Recall, Randomize, Drift Enable, etc.) that would otherwise be missed. |
-_PluginAutoPopulateThreshold=128 |
Raises the auto-populate threshold so plugins with up to 128 parameters have their controls automatically added to the device panel. Note: this may only apply to VST2 plugins. |
If you already have an
Options.txt file (perhaps with settings from other plugins),
simply append these two lines to the end of the file rather than replacing it.
For VST3 plugins, Ableton may still require you to manually add parameters via Configure mode even with the threshold setting. After configuring your preferred parameters once, right-click the device title bar and select Save As Default Configuration so they persist for all future instances.
14. Safety & Performance Guide
SnappySnap pushes the limits of what audio plugins are designed to do. Please keep the following performance tips in mind.
Modern powerhouse synths (like Serum 2, Phase Plant, or Pigments) often have others of thousands of parameters. Morphing ALL of them simultaneously effectively forces the plugin to recalculate its entire DSP engine 60 times a second.
The Fix: Avoid morphing the "entire" plugin if it is CPU-heavy. Instead, use Exclusive Randomization / Lock Mode to select only the parameters you truly want to morph (e.g., Filters, Macros, OSC params) and exclude the rest.
VST3 and AU are complex standards, and not every developer implements them identically. While SnappySnap works with the vast majority of plugins, there is a chance some rare plugins may behave weirdly when morphed aggressively.
If a specific plugin crashes or artifacts during morphing, try enabling Sanity Mode or reducing the Elasticity setting.
15. Theme Switcher
SnappySnap features two visual themes to match your preference and studio environment.
| Theme | Description |
|---|---|
| Violet Dreams | The original purple/violet color scheme. Deep space aesthetic with violet accents and purple glow effects. |
| Electric Smudge | A modern teal/cyan color scheme. Cooler tones with electric teal accents and cyan glow effects. |
Use the dropdown menu in the bottom-right corner of the plugin interface. The theme change applies immediately to all UI elements including buttons, overlays, the plugin browser, drift settings, and shader effects. The logo also changes color to match the selected theme.